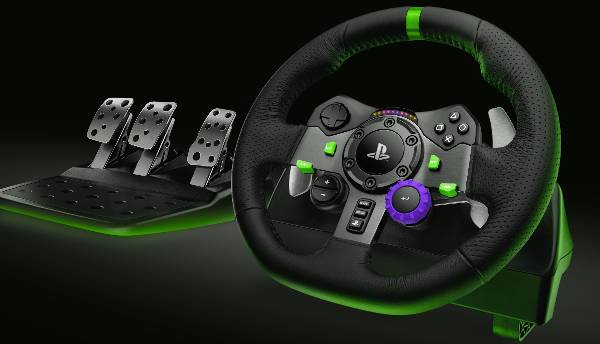
The Logitech G920 is a powerful racing wheel designed to take your gaming experience to the next level. However, for many users, setting it up and connecting it to their PC can be a daunting task. In this comprehensive guide, we’ll walk you through the step-by-step process of How to Connect Logitech G920 to PC, ensuring you’re ready to hit the virtual track in no time.
How to Connect Logitech G920 to PC
To connect the Logitech G920 to your PC, start by plugging the USB cable from the wheel’s base into an available USB port on your computer. Connect the power adapter for the wheel and plug in the pedals to the wheel base. Install the Logitech Gaming Software for customization options. Launch the software, configure settings to your preference, and ensure your PC detects the wheel. Use calibration tools in your racing game for optimal performance. Enjoy an immersive racing experience on your PC with the Logitech G920.
Step 1: Unboxing and Inspection
Before you begin connecting your Logitech G920 to your PC, it’s essential to unbox it carefully and inspect all the components. Ensure that you have the wheel, pedals, power adapter, and any other accessories that came with the package. Once you’ve confirmed everything is present and accounted for, you’re ready to move on to the next step.
Step 2: Connecting the Hardware
The Logitech G920 comes with a USB cable that you’ll use to connect it to your PC. Start by plugging one end of the USB cable into the USB port on the back of the wheel’s base. Next, connect the other end of the USB cable to an available USB port on your PC. Additionally, plug in the power adapter to provide power to the wheel. Finally, connect the pedals to the wheel base using the provided cable, ensuring a secure connection.
Step 3: Installing Logitech Gaming Software
To ensure optimal performance and customization options for your Logitech G920, it’s recommended to install the Logitech Gaming Software. You can download the software from the official Logitech website. Once downloaded, follow the on-screen instructions to complete the installation process.
Step 4: Configuring the Wheel
After installing the Logitech Gaming Software, launch the application and navigate to the settings for the G920 wheel. Here, you can customize various settings such as force feedback strength, steering sensitivity, and button assignments to suit your preferences. Take some time to experiment with different settings until you find the perfect configuration for your gaming style.
Step 5: Testing the Connection
Once you’ve configured the settings to your liking, it’s time to test the connection between the Logitech G920 and your PC. Launch your favorite racing game or simulation software and ensure that the wheel and pedals are detected correctly. You can use the software’s calibration tool to fine-tune the wheel’s sensitivity and ensure accurate input during gameplay.
Step 6: Enjoying the Experience
With your Logitech G920 successfully connected to your PC and configured to your preferences, it’s time to dive into the world of virtual racing. Whether you’re tearing up the track in a high-speed race or honing your skills in a realistic driving simulator, the Logitech G920 will provide an immersive and exhilarating gaming experience like no other.
FAQs about Logitech G920 with PC

Here are all the questions and answers:
Q1: Do I need to install special drivers to connect the Logitech G920 to my PC?
Ans: Yes, you’ll need to install the Logitech Gaming Software to ensure proper functionality and customization options for your Logitech G920. You can download the software from the official Logitech website.
Q2: Can I connect the Logitech G920 to my PC wirelessly?
Ans: No, the Logitech G920 racing wheel must be connected to your PC via a USB cable. It does not support wireless connectivity.
Q3: Do I need to calibrate the Logitech G920 after connecting it to my PC?
Ans: While the Logitech G920 is designed to be plug-and-play, it’s a good idea to calibrate it using the calibration tool provided in your racing game or simulation software. This ensures accurate input and optimal performance during gameplay.
Q4: Can I use the Logitech G920 with any racing game on PC?
Ans: The Logitech G920 is compatible with a wide range of racing games and simulation software on PC. However, it’s essential to check the game’s compatibility list or system requirements to ensure it supports the Logitech G920 before purchasing or playing.
Q5: How do I update the firmware on my Logitech G920?
Ans: You can update the firmware on your Logitech G920 using the Logitech Gaming Software. Simply launch the software, connect your G920 to your PC, and check for firmware updates in the settings or update section of the software.
Q6: Can I use the Logitech G920 with other consoles or devices besides PC?
Ans: While the Logitech G920 is primarily designed for use with PC, it can also be used with Xbox consoles, including Xbox One and Xbox Series X|S. However, additional adapters may be required for compatibility with other consoles or devices.
Q7: How do I troubleshoot connectivity issues with my Logitech G920 and PC?
Ans: If you’re experiencing connectivity issues with your Logitech G920 and PC, try the following troubleshooting steps:
- Ensure all cables are securely connected.
- Restart your PC and reconnect the G920.
- Update the Logitech Gaming Software and firmware.
- Try using a different USB port on your PC.
Contact Logitech customer support for further assistance if the issue persists.
Conclusion:
Connecting your Logitech G920 to your PC may seem like a daunting task at first, but with the right guidance, it’s a straightforward process that anyone can accomplish. By following the steps outlined in this guide, you’ll be up and running in no time, ready to experience the thrill of virtual racing like never before. So, what are you waiting for? Get behind the wheel, and let the adrenaline-fueled adventures begin!